


Is This Machine Right For You?
Expert insights for the JUKI AMERICA HZL-70HW-A Compact Size Computer Controlled Sewing Machine with 80 Stitch Patterns
This machine is great if you:
- Sew garments and crafts regularly
- Prefer computerized sewing controls
- Enjoy decorative stitch options
- Need reliable everyday sewing
- Want a compact machine
This machine may NOT be ideal if you:
- Need embroidery capability
- Quilt large quilts frequently
- Prefer mechanical machines
- Need industrial sewing speed
- Sew only occasionally
Why Many People Love This Machine
The JUKI AMERICA HZL-70HW-A Compact Size Computer Controlled Sewing Machine with 80 Stitch Patterns offers dependable stitching and useful computerized features. Many sewists appreciate the stitch selection and ease of use.
Popular Projects for This Machine
"A dependable sewing machine for hobby sewists who want computerized features in a compact design."


Features

Auto Needle Threader
The needle threader easily threads the needle and allows you to start sewing quickly.

Start/Stop Button
The color of the start/stop button indicates the status of the machine.[Green] Ready to start or while sewing[Red] Not ready to start[Orange] In bobbin winding condition

Reverse Stitch, Reinforcement Stitch
HZL-H series can sew a lock stitch at the beginning and end of sewing. There are two types of lock stitch, reverse stitch and reinforcement stitch.

Direct Pattern Selection
There are 6 types of stitch patterns, from which you can choose one by directly pushing the pattern button.

Needle Up/Down Position Button
Press the button to change up/down position of needle instantly. Also you can change needle stop position and can even sew a half stitch.

Buttonhole
HZL-H series sews the buttonhole automatically according to the size of the button.

Presser Foot Pressure
When sewing thin or thick fabrics, you can get comfortable feed.

The Current Setting is Very Visible
The Current Setting is Very Visible

Quick Reference Plate
Various stitch patterns are shown for quick selecting.
Other Features
- Free Arm
- Drop-in Bobbin
- Drop Feed
- Easy to Start Sewing Thick Fabrics
- Button Sewing
Accessories

- 1. Standard Presser Foot, 2.Zipper Foot, 3. Decorate Stitch Foot,
- 4. Overcasting Foot, 5. Blind Stitch Foot, 6. Button Sewing Foot,
- 7. Buttonhole Foot, 8. Seam Ripper/ Brush, 9. Screwdriver(S),
- 10. Screwdriver(L-shape), 11. Auxiliary Spool Pin, 12. Bobbin(3x),
- 13. Quilt Guide, 14. Spool Cap(Large), 15. Spool Cap(Small),
- 16. Spool Pin Felt, 17. Pack of Needles(3x)

Hard case

Foot Controller
SPEC / ACCESSORIES
| Table header 0 | Table header 1 |
|---|---|
| Control system(Arm size) | Computer (Arm Size 163㎜) |
| Dimensions | 400(W) x 290(H) x 188(D)mm |
| Weight | 5.8kg |
| Maximum sewing speed | 800 sti/min |
| Number of stitch patterns | 80 |
| Buttonhole | Automatic Buttonhole Length: - 3.0cm |
| Direct stitch pattern selection | ✓ |
| Start/stop button | Green: Ready to start and/or while sewing Red: Not ready to start Orange: Machine is in bobbin winding condition |
| Thread cutter | ✓ |
| Automatic needle threader | ✓ |
| Thread tension system | Standard |
| Needle up/down button | ✓ (Needle stop position switching) |
| Needle stop position | Up |
| Needle stop position switching | ✓ (Needle up/down button) |
| Lock stitch | Reverse stitch (Button system) Reinforcement stitch (Button system) |
| Feed mechanism | 7 point feed dog |
| Presser foot pressure adjustment | Stepless adjustment |
| Presser foot lift (1 step/2 steps) | Lever system: 6mm / 12mm |
| Horizontal presser foot holder button | ✓ |
| Drop feed | ✓ |
| Quick bobbin preparation | ✓ |
| Stitch length | Button system / numerical display Max. 4.5mm |
| Stitch width | Button system / numerical display Max. 7mm |
| Number of needle position (straight stitch/other than straight stitch) | 15 / - |
| Twin needle sewing | ✓ (Twin needle is option) |
| Light | 1 LED light |
| Type of hook | Horizontal hook |
| Free arm | ✓ |
| Foot controller | ✓ |
| Wide table | Option |
| Accessory storage | Auxiliary bed |
| Sewing machine cover | Hard case |
| Operation support | YouTube |
| Accessories (presser feet) | Standard presser foot (T) Zipper foot (I) Buttonhole foot (D) Overcasting foot (E) Blind stitch foot (F) Decorate stitch foot (A) Button sewing foot |
| Other accessories_1 | Bobbin (3x) Spool cap (Large) Spool cap (Small) Spool pin felt Auxiliary spool pin Screwdriver (L-shape & S) Quilt guide Seam ripper/ brush Pack of needles(3x) Power cord Foot controller Hard case Instruction manual |

Standard Presser Foot
It can be used to sew lightweight to heavyweight materials.The wide needle entry opening allows this presser foot to be used for a variety of fabrics and applications, from straight stitches to zigzag stitches.Press the black button to keep the presser foot horizontal in order to smoothly begin sewing at a thick seam.

Overcasting Presser Foot (Overedge Foot)
Sew with the edges of the fabric aligned with the guide. The prong in the opening of the presser foot presses down the edge of the fabric to prevent puckering. In addition, the amount of thread going into the stitching is adjusted by the thread crossing the prong, creating a clean finish with little shrinkage. This presser foot cannot be used to sew zigzag stitches or overcasting by 5-point zigzag.

Buttonhole Presser Foot
You can sew buttonholes of the appropriate size by simply placing the button in the button holder of the presser foot.

Decorate Stitch Presser Foot (Manual BH Presser Foot/Satin Stitch Foot)
The groove along the bottom of this presser foot ensures that the presser foot does not catch on the stitching, ensuring the fabric will be smoothly fed. Use to accurately sew a buttonhole near a thick seam that is hard to reach. Also Used to Manually Create Oversize Buttonholes.

Button Attaching Presser Foot
Be sure to first lower the feed dog so the fabric is not fed and adjust the zigzag width so the needle enters the holes in the button. To create a shank for the button, insert an awl or another similar object into the groove in the presser foot before sewing on the button so that the stitching will create a loop suitable for the thickness of the fabric.

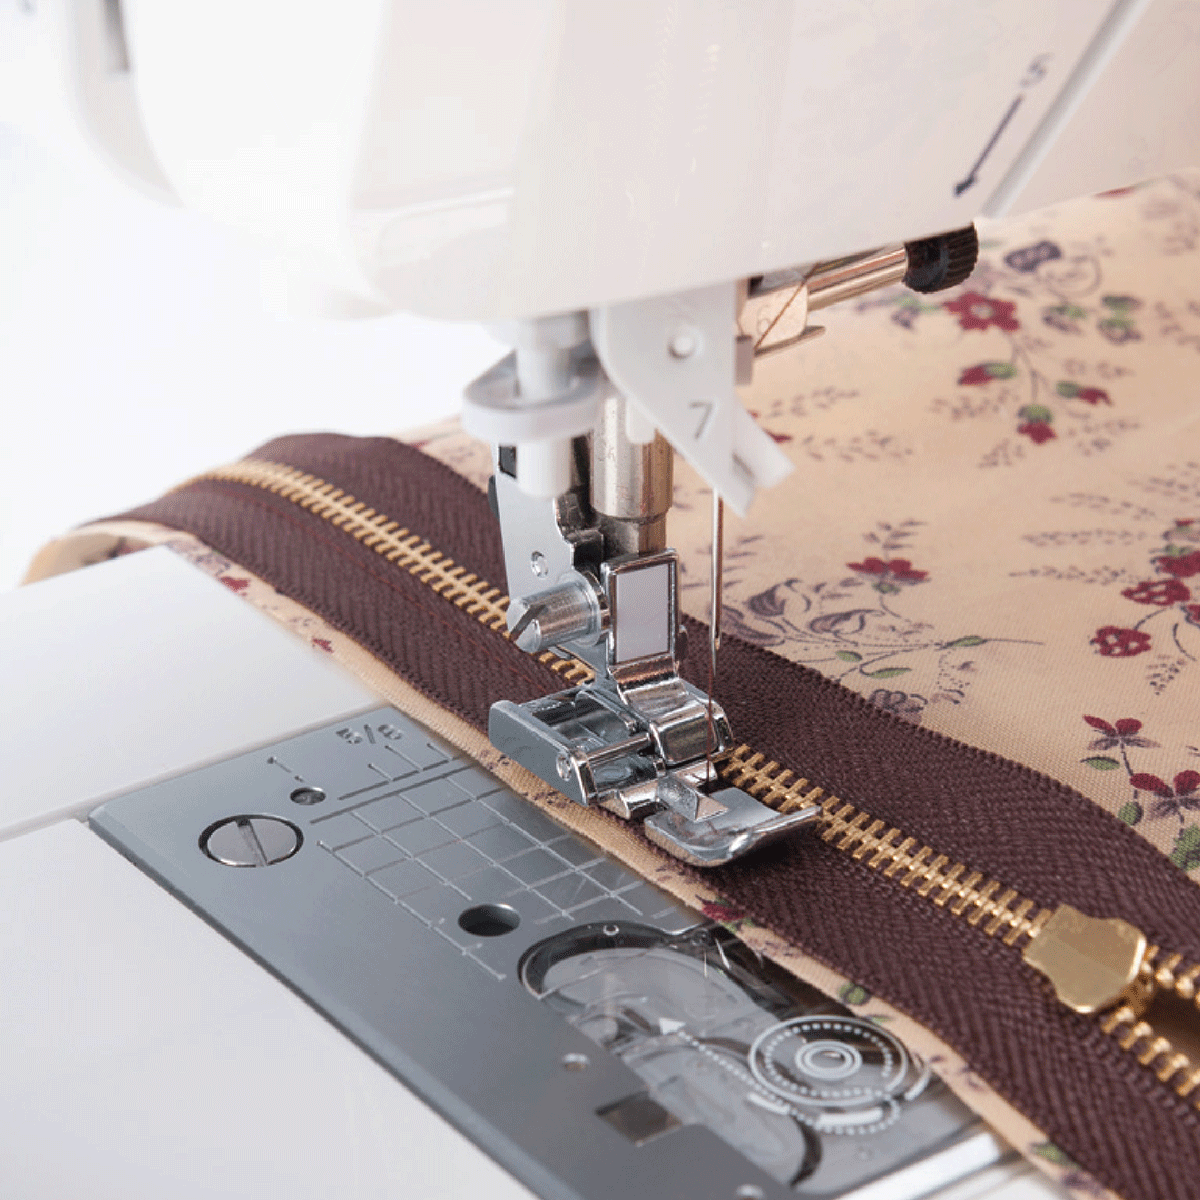
Zipper Presser Foot
Since this presser foot has a pin on the left side and on the right side for attaching it to the presser foot holder, you can attach this presser foot on either side of the needle, depending on which side of the zipper is being sewn. This presser foot can cleanly sew along the edges of the zipper without hitting the teeth.

Blind Stitch Presser Foot with adjustment guide / Blind Hem Foot with adjustment guide
By sewing with the fabric fold aligned on the guide of this presser foot,only a few threads of the fabric will be uniformly caught in the stitch. Adjust the guide position according to the fabric before sewing.

Quilt Guide
Insert this guide into the hole of the presser foot holder or the walking foot, and then sew while lightly tracing this guide along stitching. Adjust the spacing of the stitching by changing how far this guide is inserted.

Auxiliary Spool Pin (Additional Spool Pin)
Use this spool pin with a thread spool for twin needle sewing, spare machine threading or bobbin winding.

Bobbin
Since the bobbin type differs depending on your sewing machine model,be sure to use the bobbin designed for your machine.
Foot Controller
Controlling the sewing machine with your foot leaves both of your hands free while sewing.
